Setting Up Nextjs 14 with Apollo Client and Codegen CLI

Full Stack Developer | SEO
Next.js is a powerful full stack framework for building React applications with features like server-side rendering and static site generation. When combined with Apollo Client, you can efficiently manage GraphQL queries and mutations in your application. This article will guide you through the process of setting up a Next.js 14 project with Apollo Client.
Prerequisites
Before you start, ensure you have the following installed on your machine:
Node.js
npm or yarn
A Next.js application
This article assumes you already have a Next.js application set up and will not cover the steps to create one.
Setting up Apollo Client with Codegen-Cli
Since the Next.js app is already set up, run the following command to install the required dependencies:
The graphql package is a dependency of Apollo Client, used to parse and validate GraphQL queries. While we won't use graphql directly, it will be utilized by Apollo Client.
Now, create a file named client.ts inside your lib folder and place this code:
We can further enhance our client.ts code for better debugging by implementing the logger provided by Apollo Client.
Next, run the following command to install the required packages for Codegen CLI:
Then initialize the Codegen CLI by running the following command:
Codegen CLI will ask you a few questions. You can answer them as follows:
What type of application are you building? Choose Application built with React because this is a Next.js application built on top of React.
Where is your schema? Provide the GraphQL playground URL.
Where are the operations and fragments? Provide the local path of your GraphQL queries and mutations. For example, if your queries are in the root directory inside a
graphqlfolder, you can usegraphql/**/*.graphqlto tell Codegen to track each GraphQL schema inside thegraphqlfolder.Where to write the output? Provide the local path where the code generated by Codegen should be placed, for example,
generated/graphql.ts.Do you want to generate an introspection file? If yes, it will generate a JSON file that tracks the overall GraphQL schemas. We will proceed with "no" for now, but we will cover the steps for generating an introspection file as an optional or additional task later.
How to name a file config file? This will create a file that contains all the configuration for Codegen CLI. Write
codegen.yml; the default iscodegen.ts.What script in package.json should run the codegen? Choose the script to execute the codegen so it generates the code for us. The default is
codegen. We will proceed with the default codegen script, which means our Codegen CLI gets triggered when we run the "npm run codegen" command.
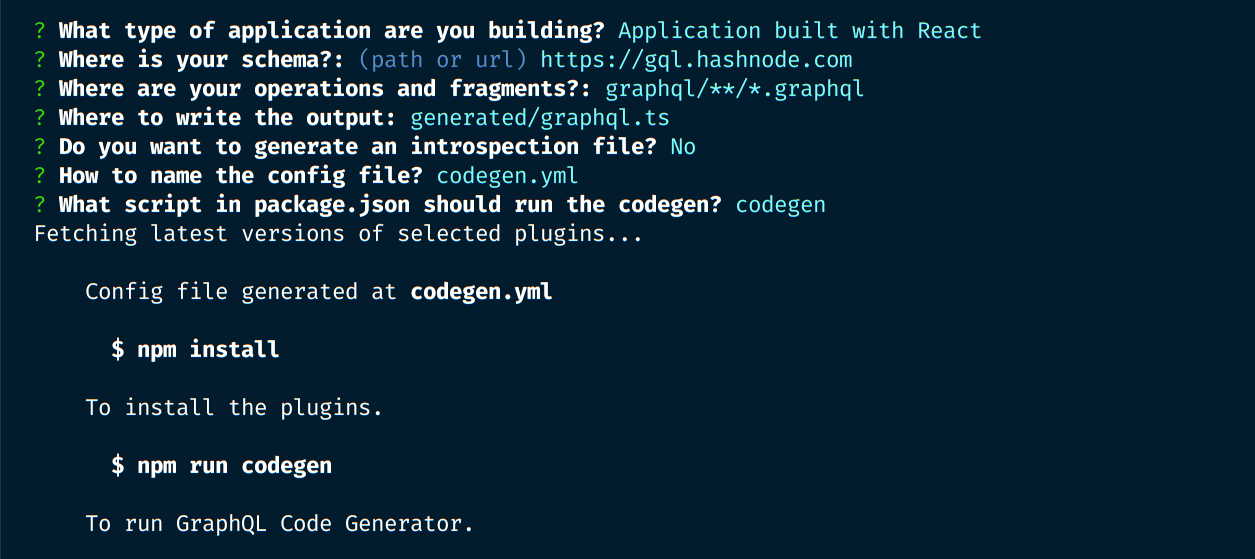
After this execution is completed, this will create a codegen.yml file in the root directory. You can check that code and update to the following code
This is configured for TypeScript and creates a Document for our query and mutation. Also, check the package.json for the new "codegen" script, which would be similar to this:
Next, let's create a GraphQL query schema for fetching publications from Hashnode's GraphQL endpoint.
First, create a new folder named query inside your graphql folder. Then, create a new file named publication.graphql inside the query folder and place the following code:
This query will fetch the id, title, slug, and content from the Hashnode API. Note the name given to this query, which is Publications; we will use it soon.
Now, run the npm run codegen command in the terminal. This will create a generated folder in the root directory, and inside that directory, there will be a graphql.ts file. This file contains the code generated by Codegen CLI for our use. While it may seem overwhelming at first, don't worry—we won't need to modify this file.
Next, update the client.ts for using the Hashnode API:
Place your Hashnode access token in the Authorization header for verification and update the URI to the Hashnode endpoint.
Create a graphql folder inside your lib folder and create a query.ts file inside the graphql folder and place the following code:
Since we have noted that our query schema name is Publications, our document name is PublicationsDocument and its respective type is PublicationsQuery. If our GraphQL query's name was XYZ, then our document name would be XYZDocument and its respective type would be XYZQuery. So, we imported our PublicationsDocument and PublicationsQuery type from the graphql.ts file generated by Codegen and used it as shown above.
Now we can invoke this function where it's necessary. For example, we are going to invoke it in the homepage, i.e., app/page.tsx:
This completes the setup of Next.js 14 with Apollo Client and Codegen CLI. You can now efficiently manage your GraphQL queries and mutations in your Next.js application.
Other important steps
Setting up introspection
To use introspection, install the following dependency:
Then, update the codegen.yml file as follows:
This configuration will create a graphql.schema.json file inside the generated folder, which will keep the record GraphQL queries and mutations.
Handling Cached Data in Apollo Client
Since Apollo Client uses the fetch API internally to retrieve data, we can leverage this feature to revalidate data at specific intervals. There are several ways to achieve this, depending on your requirements. Below, I outline four different methods to manage caching and revalidation in Apollo Client.
- Utilizing fetch options in HttpLink
You can customize the fetch behavior by using the fetch function inside HttpLink. In this example, we revalidate data every hour by passing a revalidate option to fetch.
- Using fetchOptions in HttpLink
Another way is to configure fetchOptions directly within HttpLink, specifying the revalidation interval.
- Using defaultOptions for Global Revalidation
You can set revalidation behavior globally for all queries by using defaultOptions and defining fetchOptions at the query level. In this example, data is revalidated every three hours.
- Using context in Individual Requests
For fine-grained control, you can also set caching behavior at the individual request level by providing context within a query. In this example, caching is disabled for the request.
You only need to configure one of the caching methods described above based on your use case. Don't combine multiple methods at the same time, as each approach handles caching and revalidation in a different way. Pick the one that best fits your scenario, whether it’s global caching, request-level control, or customizing the fetch function.
In Apollo Client, the cache is highly dependent on the presence of a unique identifier (id) for each field. Even if you don't think you need an id in some queries, it’s a good practice to always fetch the id field wherever possible. Failing to do so can result in unexpected caching behavior, such as stale or missing data. The id helps Apollo efficiently track and manage your cached data across queries and mutations.
Summary
This article provides a comprehensive guide to setting up a Next.js 14 project with Apollo Client and GraphQL Codegen. It covers installing necessary dependencies, configuring Apollo Client, using Codegen for type-safe GraphQL queries, setting up a sample query against Hashnode's API, and handling cached data with various revalidation strategies. Prerequisites include having Node.js, npm or yarn, and a pre-existing Next.js application. Additionally, it includes optional steps for setting up introspection to maintain schema records.

